Setup Exploration
What’s in the box?
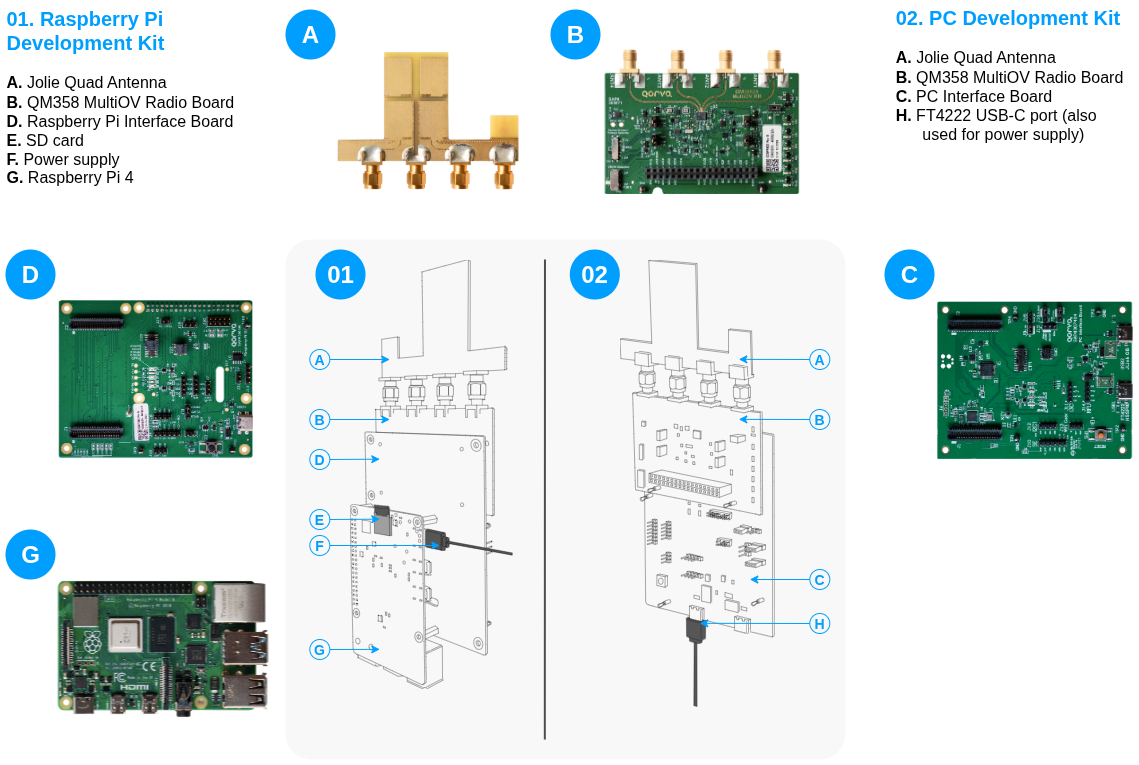
Figure 1 QM35825 Development Kit content
Connect the Kit
Step-by-step instructions for setting up the QM35825DK-05 development kit:
For Raspberry Pi Development Kit:
Ensure the SD card is inserted into the Raspberry Pi (refer to figure 2.1 for the Micro SD Card slot location).
Connect the USB-C cable from the Raspberry Pi to a computer (refer to figure 2.1 for the USB-C connector location).
Verify power indicators - ensure that the LED indicators on the Raspberry Pi, on the RPi Interface Board and on the QM35 Radio Board are on. For further details, refer to the
QM35_DK-05_HW_User_Manual.pdf.
For PC Development Kit:
Connect the USB-C cable from the QM35 PC Interface Board to a computer’s USB port (refer to figure 2.1 for the USB-C connector location).
Verify power indicators - ensure that the LED indicators on the QM35 PC Interface Board and on the QM35 Radio Board are on. For further details, refer to the
QM35_DK-05_HW_User_Manual.pdf.
Note
Ensure that the PC’s USB port can deliver enough power to turn on the RPi.
Discover Qorvo®’s UWB technology with the Explorer App
The Explorer App is a cross-platform graphical user interface (GUI) application designed to evaluate the Ultra-Wideband (UWB) capabilities of the QM35. It is available for both Windows and macOS.
The application includes two main modules introducing key UWB use cases:
Localization Application: Offers a comprehensive interface for configuring FiRa ranging parameters and visualizing real-time results such as distance and Angle of Arrival (AoA). The intuitive graphical interface ensures a smooth and user-friendly experience.
Sensing Application: Showcases the radar capabilities of the QM35 SoC by enabling real-time visualization of Channel Impulse Response (CIR) data. It also includes a sample presence detection algorithm within the application to demonstrate practical sensing use cases.
Getting Started with the Explorer App:
Install the application on Windows or Mac OS
Locate the Explorer App installer from the
Applications/Explorerfolder of the QM35 SDK package.Run the installer and follow the on-screen instructions.
Connect and Discover Devices
Connect the QM35825DK-05 boards into a computer using USB-C cables (refer to the figure 2.1).
Launch the Explorer App and choose either the Localization or Sensing module.
If prompted, select the QM35825DK-05 kit from the welcome screen.
Verify that the boards are detected.
Note
The Raspberry Pi may take several seconds to appear in the device list due to its Linux boot-up time.
Start Ranging/Sensing
Click on “Save and start” to initiate Localization or Sensing by using default configuration. Alternatively, navigate to the configuration panels to access the various settings menus.
Note
For Localization “Advanced settings” menu, refers to UWB_L1_Configuration.pdf.